초보자를위한 C# 예제 책으로 진행
Chart 컨트롤 사용(550p)
윈폼에는 다양한 차트를 만들 수 있는 Chart 컨트롤이 제공되는데 System.Windows.Forms.DataVisulization.Charting 네임스페이스 안에있으므로 using 문으로 포함시켜야한다.(알트 엔터를 써보자)
Chart 컨트롤은 도구상자의 Data 부분에 있는데 드래그 앤 드롭하면 그래프 모양의 차트가 나타난다.
- ChartArea : 차트가 그려지는 영역이며, 하나의 차트 차트 객체는 하나 이상의 ChartArea(차트영역)을 가질 수 있다.
- Series : 차트 영역에 표시되는 데이터이다. 하나의 차트 영역에 두 개 이상의 시리즈가 있을 수 있다. 차트의 종류를 지정할 수 있으며 차트 영역이 두 개 이상이라면 시리즈별로 어떤 차트 영역에 그려질지 결정할 수 있다.
- legends : 차트의 범례이다.
- Tiltles : 차트 컨트롤 상단에 표시되는 제목이다.
10명의 학생의 랜덤점수 생성해보고 차트에 출력해보자

이벤트 메서드 구문
 private void Form1_Load(object sender, EventArgs e)
        {
            this.Text = "Using Chart Control";  // 속성창에서 Text 수정하는것과 같은거임
            //10명의 학생 랜덤점수 생성 및 차트 바인딩
            Random rand = new Random();
            chart1.Titles.Add("중간고사 성적");
            for(int i = 0; i<10; i++)
            {
                chart1.Series["Score"].Points.Add(rand.Next(100));
            }
            chart1.Series["Score"].LegendText = "수학점수";
            chart1.Series["Score"].ChartType = SeriesChartType.Line;   // 차트의 유형을 선 그래프로 바꿔줌
        }

        private void button1_Click(object sender, EventArgs e)
        {
            chart1.Series["Score"].Points.Clear();
            MessageBox.Show("데이터를 지웠습니다", "처리", MessageBoxButtons.OK, MessageBoxIcon.Information);
        }

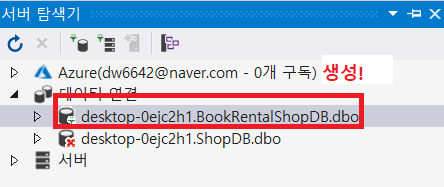
비쥬얼 스튜디오랑 SSMS를 연동해서 로그인 폼을 만들어보자
일단 SSMS에 밑의 쿼리문을 각각 실행해주자
USE bookrentalshop
GO
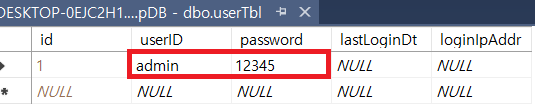
CREATE TABLE userTbl (
id int IDENTITY(1,1) NOT NULL PRIMARY KEY,
userID varchar(12) NOT NULL,
password varchar(max) NOT NULL,
lastLoginDt datetime NULL,
loginIpAddr varchar(30) NULL
)
GOUSE bookrentalshop
Go
따로 실행
CREATE TABLE CREATE TABLE userTbl (
id int IDENTITY(1,1) NOT NULL PRIMARY KEY,
userID varchar(12) NOT NULL,
password varchar(max) NOT NULL,
lastLoginDt datetime NULL,
loginIpAddr varchar(30) NULL
)
GO
따로 실행해서 userTbl 테이블을 생성해준다.
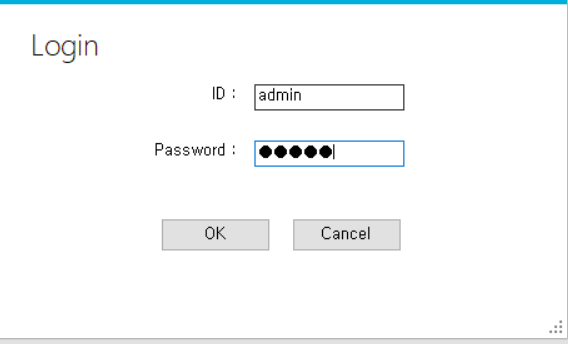
로그인 창을 따로 띄우기위해 새 항목을 생성

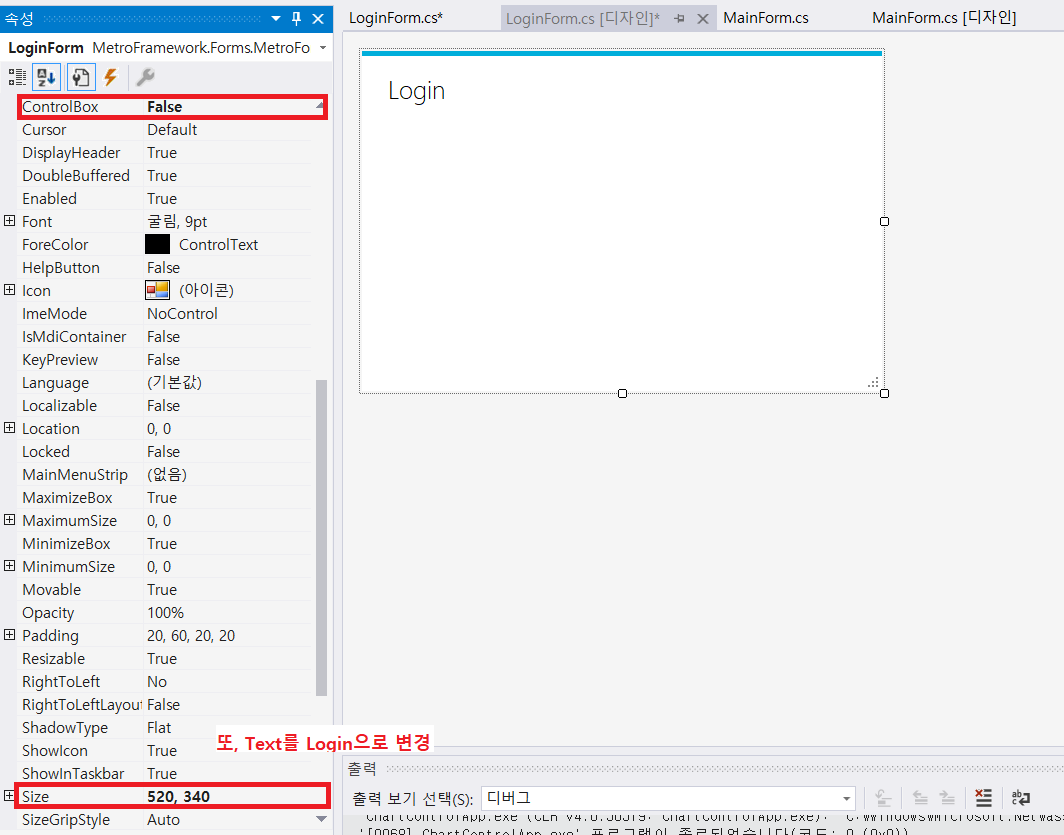
최대, 최소화 닫기 버튼인 ControlBox를 False
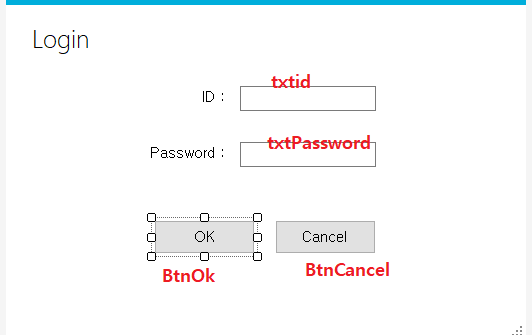
txtid, txtPassword, BtnOk, BtnCancel 순으로 TabIndex의 순서를 0, 1, 2, 3으로 지정
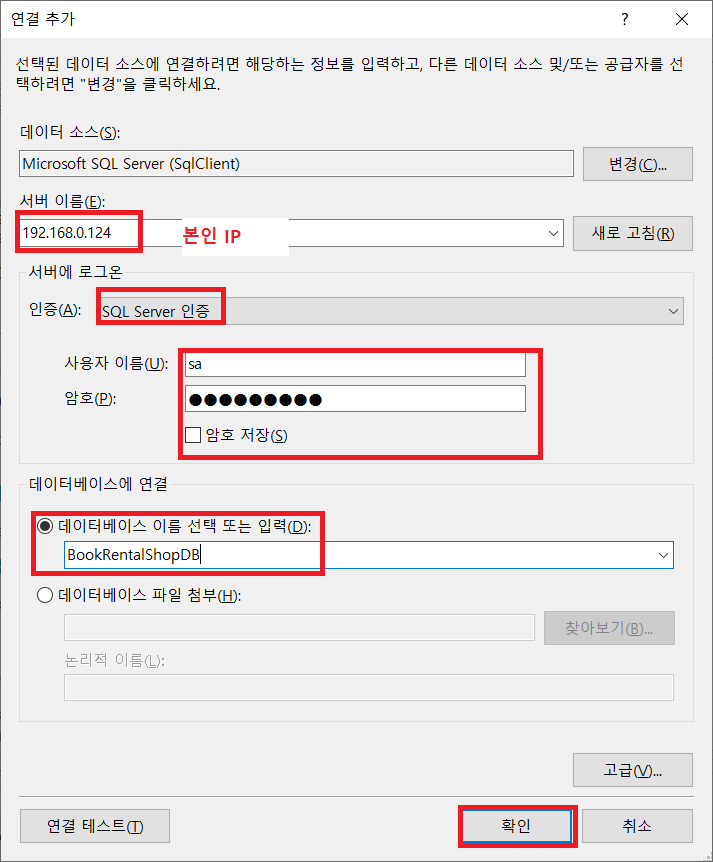
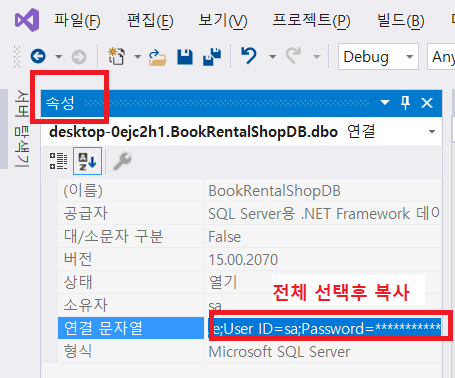
데이터베이스와 SSMS 연동하는 문자열 작성

using System;
using System.Collections.Generic;
using System.ComponentModel;
using System.Data;
using System.Data.SqlClient;
using System.Diagnostics;
using System.Drawing;
using System.Linq;
using System.Text;
using System.Threading.Tasks;
using System.Windows.Forms;
using MetroFramework;
using MetroFramework.Forms;
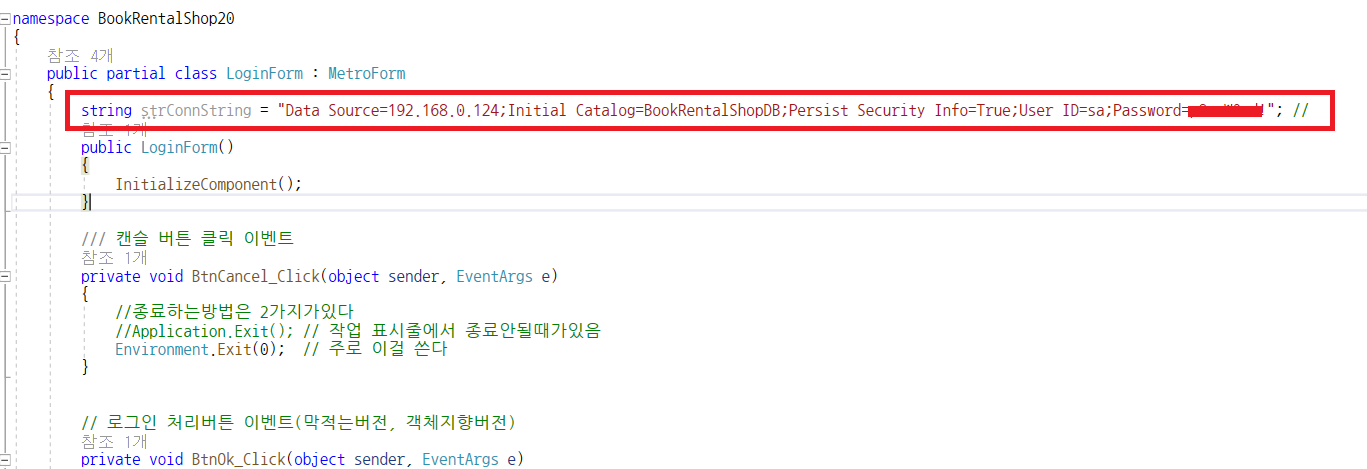
namespace BookRentalShop20
{
public partial class LoginForm : MetroForm
{
string strConnString = "Data Source=192.168.0.124;Initial Catalog=BookRentalShopDB;Persist Security Info=True;User ID=sa;Password=p@ssw0rd!"; //
public LoginForm()
{
InitializeComponent();
}
// 캔슬 버튼 클릭 이벤트
private void BtnCancel_Click(object sender, EventArgs e)
{
//종료하는방법은 2가지가있다
//Application.Exit(); // 작업 표시줄에서 종료안될때가있음
Environment.Exit(0); // 주로 이걸 쓴다
}
// 로그인 처리버튼 이벤트
private void BtnOk_Click(object sender, EventArgs e)
{
LoginProcess();
}
private void txtId_KeyPress(object sender, KeyPressEventArgs e)
{
if (e.KeyChar == (char)13) // ID창에서 엔터치면 포커싱됨
{
txtPassword.Focus();
}
}
private void txtPassword_KeyPress(object sender, KeyPressEventArgs e)
{
if (e.KeyChar == (char)13) // 패스워드 창에서 엔터치면 OK 포커싱
{
LoginProcess(); // 일단 메서드 이름을 만들고 Alt + 엔터를 눌러서 메서드를 생성할 수 있다
}
}
private void LoginProcess() // Alt + 엔터로 생성된 메서드
{
// throw new NotImplementedException();
if (string.IsNullOrEmpty(txtId.Text) ||
string.IsNullOrEmpty(txtPassword.Text))
{
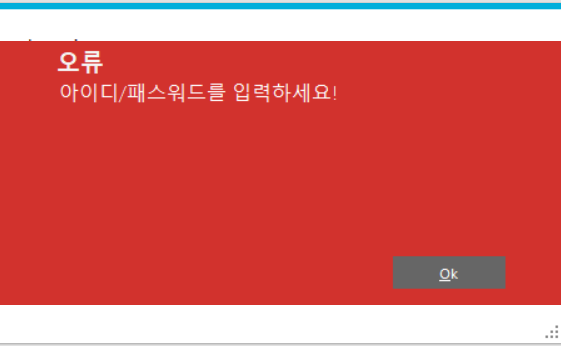
MetroMessageBox.Show(this, "아이디/패스워드를 입력하세요!", "오류",
MessageBoxButtons.OK, MessageBoxIcon.Error);
return;
}
string struserID = string.Empty;
using (SqlConnection conn = new SqlConnection(strConnString)) // strConnStiring의 출처가 알고싶으면 커서를 두고 정의로 이동 또는 F12를 누른다
{
conn.Open();
SqlCommand cmd = new SqlCommand();
cmd.Connection = conn;
cmd.CommandText = "SELECT userID FROm userTbl " +
" WHERE userID = @userID " +
" AND password = @password ";
// sql 명령문 입력(이 구문만 입력하면 Sql 인젝션으로 해킹당할 수 있다
// 그러므로 밑의 구문도 입력해준다)
// ID
SqlParameter parmUserId = new SqlParameter("@userID", SqlDbType.VarChar, 12);
//DB userID라는 필드가 varchar(12)로 지정되어있어서 지정
parmUserId.Value = txtId.Text;
cmd.Parameters.Add(parmUserId);
// 패스워드
SqlParameter parmUserPassword = new SqlParameter("@password", SqlDbType.VarChar, 20);
parmUserPassword.Value = txtPassword.Text;
cmd.Parameters.Add(parmUserPassword);
SqlDataReader reader = cmd.ExecuteReader();
reader.Read(); // sql 데이터를 읽음
struserID = reader["userID"].ToString(); // 돌려받는 값이라서 @userID가 아니라 userID이다.
MetroMessageBox.Show(this, "접속성공", "로그인");
Debug.WriteLine("On the Debug");
}
}
}
}

왠만하면 일일이 설명적고 따로 이미지 캡처하고할텐데 오늘은 따라가느라 내용이 얼마없네요.. 구문 이해는 다음에 하는걸로 하겠습니다.. 오늘은 여기까지..
==========================================================================
P.S)
흑백으로된 윈폼창을 튜닝해보자.


https://www.telerik.com/products/winforms.aspx
Comprehensive UI toolbox of 140+ controls - Telerik UI for WinForms
Comprehensive UI toolbox with 140+ controls for building rich and beautiful WinForms desktop applications. Enjoy 20+ Professional looking themes and Document Processing Libraries out of the box.
www.telerik.com
JetBrains: Developer Tools for Professionals and Teams
JetBrains is a cutting-edge software vendor specializing in the creation of intelligent development tools, including IntelliJ IDEA – the leading Java IDE, and the Kotlin programming language.
www.jetbrains.com
https://www.devexpress.com/products/net/controls/winforms/
WinForms UI Controls for Visual Studio | DevExpress
The award-winning DevExpress WinForms Subscription includes 180+ UI Controls and Libraries, including Data Grid, Reporting, Chart, Spreadsheet, and many more.
www.devexpress.com
참고로 이 3개의 사이트에서 윈폼을 흑백에서 다른 색상으로 바꿀 수 있다.(돈만 주면 다 이쁘게된다)
'개발자과정준비 > WinForm' 카테고리의 다른 글
| [WinForm] 6. 윈폼과 SSMS 연동(3) (0) | 2020.06.23 |
|---|---|
| [WinForm] 5. 윈폼과 SSMS 연동(2) 로그인폼 구현 (0) | 2020.06.21 |
| [WinForm] 3. 메뉴, 리스트 뷰, 트리뷰, 프로그레스바, 타이머, 그래픽, 도형 구조체, Color 구조체, Pen 클래스 (0) | 2020.06.18 |
| [WinForm] 2. 컨트롤, 대화상자, 텍스트박스, 메인 메뉴, 고급 폼 (0) | 2020.06.16 |
| [WinForm] 1. C# 제네릭, 예외, 윈폼 입문 (0) | 2020.06.16 |
